VCK5000 Building and Emulation
The VCK5000 contains a VC1902 Versal AI-core ACAP and 16GB of DDR-DRAM. This is an interesting architecture as it provides AI engines which are VLIW processors that can perform vectorised arithmetic. It is suggested that you are already familiar with programming the non-Versal Alveo cards (e.g. the U280 or U250) before working with the VCK5000 as the concepts there will be required.
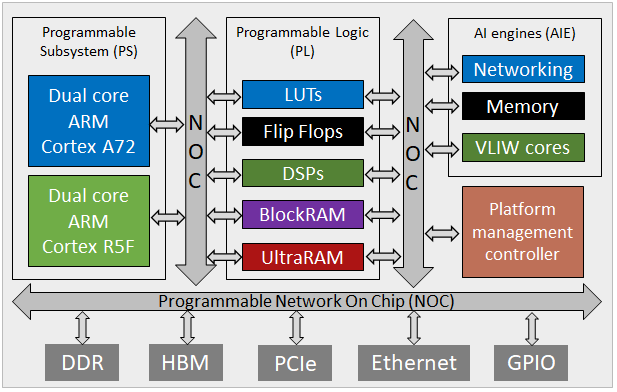
Versal chip specifications
The VC1902 Versals we have are of the AI-core family and combine Programmable Subsystem (PS), Programmable Logic (PL), and AI engines. The PS comprises a dual-Core ARM Cortex-A72 and dual-Core ARM Cortex-R5, the PL provides 900K LUTs, 1968 DSPs, 4.2MB BRAM, and 16.3MB URAM. There are 400 AI engines each of which is a 7-way VLIW core running at 1.2GHz and capable for performing vectorised fixed-point and (single precision) floating-point arithmetic operations. The board itself also provides 16GB of DDR-DRAM and PCIe-Gen4.
For more details about AIE development then see the programmers guide and best practice guide.
Xilinx toolchain
You should first load the vitis/2022.1 module, module load vitis/2022.1. This will make available Xilinx specific tooling, including v++, vivado, vitis_hls, vitis, and vitis_analyser into your environment, as well as setting up the correct OpenCL environment for hardware emulation. It is important to use the 2022.1 version of the tooling here, as previous versions do not fully support the VCK5000.
NOTE:
There are some incompatibilities with GNU and associated modules. By default the vitis/2022.1 module will load the gnu7/7.3.0 which works fine, however other versions of GCC on the machine indexed under /home/software/modulefiles load modules which result in bitstreams that are not compatible.
We have developed a simple number sum example here to demonstrate using the Xilinx VCK5000 toolchain on the testbed, this can also be used as a skeleton structure for more complex FPGA codes if that is helpful. It should be noted that this is more involved than building for the Alveos due to the inclusion of the AI engines.
[username@nextgenio-login2 ~]$ git clone https://github.com/FPGAtestbed/vck5000_sum_example.git
[username@nextgenio-login2 ~]$ cd vck5000_sum_example
Building for the AI engines
The aiengine directory in this example contains the code, makefile, and test-files for the AI engines. Two modes of building and simulation are supported, x86 and native. We will build for x86 first, which can be thought of as software emulation - namely that it is a bit faster but doesn’t provide the same level of in-depth testing.
[username@nextgenio-login2 ~]$ cd aiengine
[username@nextgenio-login2 ~]$ make aie_compile_x86
......
[username@nextgenio-login2 ~]$ make aie_simulate_x86
Where the make aie_compile_x86 builds the code for x86 simulation, and make aie_simulate_x86 will call the x86 simulator to execute the built code. If you look in the data directory you will see two files, input.txt and num_elements.txt, it is data from these which are fed into the AIE graph during simulation. The result of simulation can be found in x86simulator_output/data/output.txt.
Next is to build the AIE code natively, this is the format not only used for native testing but also for programming the actual AIEs themselves.
[username@nextgenio-login2 ~]$ make aie_compile
......
[username@nextgenio-login2 ~]$ make aie_simulate
Again, those input files are used to drive the simulation and the result of the run can be found in aiesimulator_output/data/output.txt. You will see a file named libadf.a in the top level aiengine directory. This is the build AIE code which we will deploy on the VCK5000’s AI engines.
Building the host code
The sw directory contains the host code for driving this example. The code itself, and execution model, is pretty similar to what one would expect when programming other, non-Versal, Alveo cards. It can be seen that the main interaction is with the xclbin file (that we will build in a minute), deploying this as usual to the FPGA and then setting up kernels, buffers, and marshalling their execution. It should be noted that there is no explicit interaction with the AIE graph here, whilst the XRT API does provide calls for this it is not supported when host code is driven by the host CPU (compared to when it’s deployed on the PS).
From the top level vck5000_sum_example directory:
[username@nextgenio-login2 ~]$ cd sw
[username@nextgenio-login2 ~]$ make host
After executing this step you will see a new bin directory at the top level, this will contain the built host application code.
Building the PL code
Building the HLS code for the PL is very similar to non-Versal Alveo cards, with the only difference being that there is an additional packaging step required which combines the PL and AIE aspects togther. In this example we have two HLS kernels, device_mm2s.cpp which streams data onto the AIEs and device_s2mm.cpp which streams data off the AIEs.
NOTE:
If you look in device_mm2s.cpp you will see that the number of elements and add value are streamed into the AIE code at the start of execution, and in the corresponding AIE code you can see how this is retrieved. Whilst the AIEs provide a better way of doing this by runtime modifyable parameters, on the VCK5000 as we can not manipulate the AIE graph from the host this approach is the only one possible.
Assuming you have built the AIE code natively as above, then from the top level vck5000_sum_example directory:
[username@nextgenio-login2 ~]$ cd hw
[username@nextgenio-login2 ~]$ make device TARGET=hw_emu
This will result in the file sum.hw_emu.xclbin in the top level bin directory which is ready to run in HW emulation.
Hardware emulation
Once you have built the required files then there should be two files in the top level bin directory. These are host which is the host application driver, and sum.hw_emu.xclbin which contains the PL and AIE codes. Once sum.hw_emu.xclbin is loaded by the host code then it will configure the PL with your kernels and programme the AIEs based on the code that has been built.
Running for hardware emulation is the same as other Alveo cards that support Vitis:
[username@nextgenio-login2 ~]$ cd bin
[username@nextgenio-login2 ~]$ export XCL_EMULATION_MODE=hw_emu
[username@nextgenio-login2 ~]$ ./host sum.hw_emu.xclbin 16
Where we provide the name of the bitstream and number of elements to sum (which is always rounded up to the nearest multiple of eight due to 8-way vectorisation of single precision floating point operations on the AIEs).
NOTE:
When emulating for the VCK5000, the hardware emulator doesn’t tend to terminate cleanly after execution has completed. The host code will finish and it will inform that the hardware emulator is shutting down, but then it hangs. You can Ctrl-C out of it, but you should then issue ps to ensure there are no zombie processes running. If there are you can issues source kilall.sh to kill them (you can get this by loading the common_fpga module).
Building for hardware and quick builds
To build for hardware, similarly to hardware emulation the AIE code must be built natively (e.g. make aie_compile). Then in the hw directory issue make device TARGET=hw . Remember to unset the XCL_EMULATION_MODE environment variable when then running it. A suggested flow is:
[username@nextgenio-login2 ~]$ nohup make device TARGET=hw &> output &
[username@nextgenio-login2 ~]$ tail -fn2000 output
This will build the bitstream as a background process, and by tailing the output file then you can view in real time the progress. Vitis creates numerous sub-processes and a disadvantage of this nohup approach is if you then want to terminate the build, for instance if you realise there is an error in the code that needs corrected, then it can be very time consuming to kill each individual process. Instead, we have provided a killall script in the common_fpga module which will kill all the processes running either foreground or background in the current terminal.
[username@nextgenio-login2 ~]$ module load common_fpga
[username@nextgenio-login2 ~]$ source killall.sh
Quick builds
If you modify your AIE code and rebuilt it, then as long as you haven’t changed the interface between the PL and AIE (e.g. the number or configuration of streams) then you don’t need to fully rebuild the bitstream. This is advantageous as it will cut out the (potentially very) time consuming process required by a full build. Instead, if you already have the .xsa file (e.g. you have done a full build previously) then you can simply to a repackage which only takes a few seconds.
To do this for our example here, in the hw directory you can use the repackage rule, e.g. by issuing make repackage TARGET=hw_emu (this also works when building for hardware too).
[username@nextgenio-login2 ~]$ make repackage TARGET=hw_emu
Troubleshooting
If you are using the native XRT C++ API, and on building get an error like below, this is because the XRT libraries have been compiled without using the C++11 ABI, therefore it expects std::string whereas the C++11 string is std::__cxx11::basic_string and these things are seen as incompatible by the linker. To address this you need to compile your host code with D_GLIBCXX_USE_CXX11_ABI=0 passed as a command line argument which will build the code without the C++11 ABI and hence make it compatible with the XRT built library.
ost_overlay.cpp:(.text+0x11a7): undefined reference to `xrt::device::load_xclbin(std::__cxx11::basic_string<char, std::char_traits<char>, std::allocator<char> > const&)'